Adding Elm to Phoenix
Posted on January 04, 2018 by in Elixir, Phoenix, Elm, JavaScript
Unless you’ve been hiding under rock for the past year or so, you should be aware of Elm. If so far you have managed to miss this language/paradigm in your learning then there is no time like the present to pick it up and get familiar. This article will present how to include Elm in your Phoenix projects so that your Elm code is intergrated into the asset pipeline and built automatically as you create a Phoenix application.
For the uniniatated, Elm is a functional programming langauge that uses Haskell-like syntax and a javascript based runtime that enables you to build web components and SPA’s. It is interoperable with javascript (it transpiles), but allows you to write pure functional code will all the messy interactions abstracted out. A great place to start is Elm Examples, and you won’t go far wrong if you get hold of Elm in Action (Manning) or Programming Elm (PragProg). A detailed discussion about Elm is far too long for this article, so we’re assuming at least passing familiarity. We’re also assuming that you’re comfortable with Phoenix and Elixir - at least enough to set up JSON API’s using Phoenix. For this application, we’re going to be scaffolding out the API for expediency. We’re not advocating that you build a production application this way, but for a toy app like this one its fine. Let’s go ahead and create the app, which I’ll call ElmOnFire… When asked, go ahead and install the dependencies. Once this is done, update the database configuration to your local dev database (config/dev.exs): You can then go ahead and create the database: All being well, you can now fire up Phoenix and see the standard initial landing page (http://localhost:4000): So far so good. Nothing unusual there. Let’s create a quick JSON API that returns some data so that we have something to display in our Elm app to show that everything works nicely. Then do what the cmd line tells you and add the resources line given to your router. Once these changes have been done, save the router file and run the migration. Let’s populate the database with some data - here’s a seed file that I prepared earlier. Put this file at priv/repo/seeds.exs and then run: With this data now in, we can test the API is working. If you haven’t already, start the server and hit the endpoint to see if its all working: With this working we can now add Elm into the mix. So lets add Elm to the pipeline, in your assets folder run: and add a new elm/ folder to the assets/ folder, so we have: With that now added, we need to update the brunch-config.js file to enable the build process. Change the list of watched directories (~ line 40) from: To and add the following to the plugins object (~ line 51) In the newly created assets/elm, start creating the Elm app. For this we’re going to need the elm core (which all Elm projects need), but also we’ll need the HTTP module so that we can fetch the feed data and NoRedInks decode pipeline to facilitate easier decoding of the JSON package to our model in Elm. This is going to be a fairly simple app, so we’re going to keep things in one file, Main.elm, and we already know that we’re going to be using a remote API, so we’ll be using the Elm Html.program function right off the bat. Create a new file assets/elm/Main.elm and fill with the following code If you can’t be bothered to type all that in, you can download from here Main.elm Then in your lib/elm_on_fire_web/templates/page/index.html.eex, replace all the content with: and add to your assets/js/app.js file. Start your Phoenix server if it’s not running, and go to http://localhost:4000 and you should see:
That’s its for now. EnjoyElm
What you will need…
Start the Phoenix build
$ mix phx.new elm_on_fireconfig :elm_on_fire, ElmOnFire.Repo,
adapter: Ecto.Adapters.Postgres,
username: "postgres", <----- Update here
password: "postgres", <----- and here
database: "elm_on_fire_dev",
hostname: "localhost",
pool_size: 10$ mix ecto.create$ mix phx.serverCreate the API
$ mix phx.gen.json Students Student students name:string age:integer subject:string classification:stringlib/elm_on_fire_web/router.exdefmodule ElmOnFireWeb.Router do
use ElmOnFireWeb, :router
...
# Other scopes may use custom stacks.
scope "/api", ElmOnFireWeb do
pipe_through :api
resources "/students", StudentController, except: [:new, :edit]
end
end$ mix ecto.migrate$ mix run priv/repo/seeds.exs$ curl -H 'Content-Type: application/json' http://localhost:4000/api/students
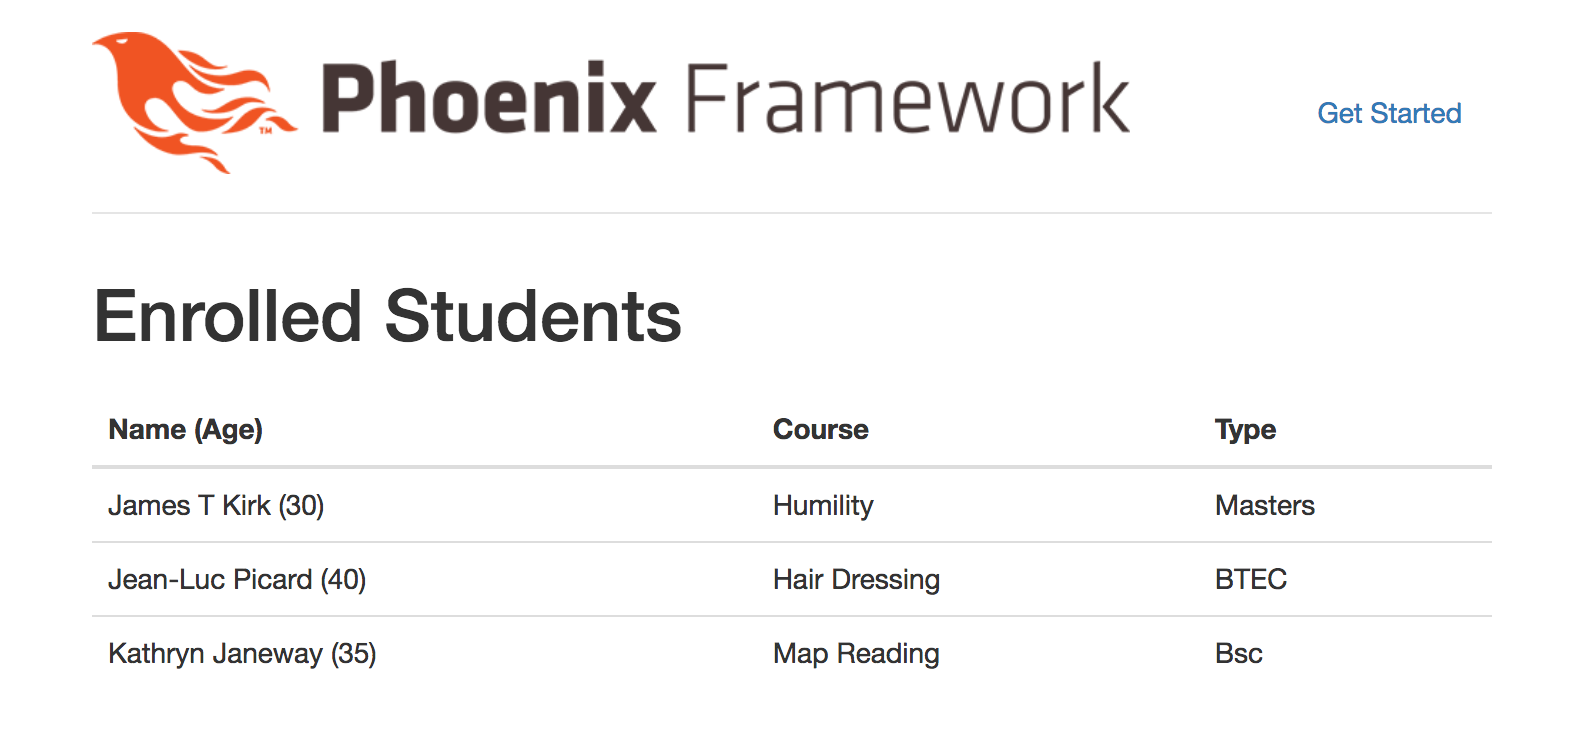
{"data":[{"subject":"Humility","name":"James T Kirk","id":1,"classification":"Masters","age":30},{"subject":"Hair Dressing","name":"Jean-Luc Picard","id":2,"classification":"BTEC","age":40},{"subject":"Map Reading","name":"Kathryn Janeway","id":3,"classification":"Bsc","age":35}]}%Add Elm
$ npm i elm
$ npm i elm-brunch --save-develm_on_fire/
assets/
elm/
js/watched: ["static", "css", "js", "vendor"],watched: ["static", "css", "js", "vendor", "elm"],elmBrunch: {
elmFolder: "elm/",
mainModules: ["Main.elm"],
outputFolder: "../vendor/"
}$ cd /assets/elm
$ elm package install -y elm-lang/core
$ elm package install -y elm-lang/http
$ elm package install -y NoRedInk/elm-decode-pipelineBuild the Elm App
module Main exposing (main)

import Html exposing (..)
import Html.Attributes exposing (class)
import Json.Decode exposing (string, int, list, Decoder, at)
import Json.Decode.Pipeline exposing (decode, required)
import Http
import Debug


type alias Student =
    { name : String
    , age : Int
    , subject : String
    , classification : String
    }


type alias Model =
    { students : List Student
    }


type Msg
    = StudentData (Result Http.Error (List Student))


initialModel : Model
initialModel =
    { students =
        [ { name = ""
          , age = 0
          , subject = ""
          , classification = ""
          }
        ]
    }


studentDecoder : Decoder Student
studentDecoder =
    decode Student
        |> required "name" string
        |> required "age" int
        |> required "subject" string
        |> required "classification" string


decodeList : Decoder (List Student)
decodeList =
    list studentDecoder


decoder : Decoder (List Student)
decoder =
    at [ "data" ] decodeList


initialCmd : Cmd Msg
initialCmd =
    decoder
        |> Http.get "http://localhost:4000/api/students"
        |> Http.send StudentData


init : ( Model, Cmd Msg )
init =
    ( initialModel, initialCmd )


viewStudent : Student -> Html Msg
viewStudent student =
    tr []
        [ td [] [ text (student.name ++ " (" ++ toString student.age ++ ")") ]
        , td [] [ text student.subject ]
        , td [] [ text student.classification ]
        ]


view : Model -> Html Msg
view model =
    div []
        [ h1 [] [ text "Enrolled Students" ]
        , table [ class "table" ]
            [ thead []
                [ tr []
                    [ th [] [ text "Name (Age)" ]
                    , th [] [ text "Course" ]
                    , th [] [ text "Type" ]
                    ]
                ]
            , tbody [] (List.map viewStudent model.students)
            ]
        ]


update : Msg -> Model -> ( Model, Cmd Msg )
update msg model =
    case msg of
        StudentData (Ok students) ->
            ( { model | students = students }, Cmd.none )

        StudentData (Err _) ->
            ( model, Cmd.none )


main : Program Never Model Msg
main =
    program
        { init = init
        , view = view
        , update = update
        , subscriptions = \_ -> Sub.none
        }
<div id="elm-main"></div>const elmDiv = document.getElementById('elm-main')
, elmApp = Elm.Main.embed(elmDiv);